
Friday, May 17, 2013
Cheddar Pecan Wafers
\ABS\Auto Blog Samurai\data\Healthy Recipe Collections\all\Cheddar-Pecan-Wafers.jpg)
Vietnamese chicken curry
This chicken curry is a traditional flat Vietnamese that warms the taste buds! Depending on the sensitivity of your palate, feel free to review a little quantities of spices. Thanks to Thi Hanh for making me discover this dish!
First, prepare the chicken for marinade: Remove skin from the chicken legs and then cut them into pieces of 2-3 cm. Take care well to remove any small bones. Marinate the chicken pieces with the spices (ginger, Lemongrass, curry) for at least 20 minutes in the refrigerator.
Cut the onion into 4 small potatoes in 2 and carrots in large cubes. In a saucepan, fry the onion in oil and then add the chicken and let come back for about 15 minutes over high heat, stirring often. Add the glass of water, carrots, potatoes, sugar and coconut milk. Simmer for about 30 minutes.
Chicken and potatoes should be tender.
Serve your curry chicken in individual serving bowls.

Thursday, May 16, 2013
Snapshot Saturday
Fully embracing where I live means embracing lefse.
Do you know lefse? It’s a super thin Norwegian flatbread. Made from potatoes and cream and a few other simple goodies, it is soft and delicious. Traditionally eaten with just a bit of butter, I have to admit that it’s dreamy with a touch of sugar, too.
After several thinly veiled hints, my friend Joni was nice enough to invite me over to learn how to make it. Lefse is a labor of love, man. We slaved for hours, and by slaving, I mean I took pictures while Veronica, Joni and Amanda did the slaving. But I was learning. Seriously. Learning a lot. And tasting. I was tasting. For research purposes of course.
My favorite parts were listening to Joni’s stories (making lefse is all about the stories), watching Veronica who is from Mexico roll the most perfect lefse ever on her first try, and laughing as Joni threw flour in Amanda’s face. Mother, daughter love at it’s finest. I have a feeling there will be a lot of lefse in my future. Come on over and we’ll make it together!


Golden Skillet Potatoes {And Let’s Talk Food Allergies for a Second…}

Food allergies. What does that mean to you? My own little family has been blessed significantly in that we don’t have any food allergies to speak of among the 7 of us (yet…) and trust me, I am grateful every day for that; however, I have friend upon friend upon friend who deal with food allergies every minute of every day. We’re talking egg allergies, nut allergies, dairy allergies. Wheat allergies, shellfish allergies, soy allergies and many more. Some of these families even deal with multiple allergies and many of them are trying to navigate the public school system and society in general with these allergies (screaming in their pillow along the way, I’m sure). I bow down to each of you. I really do.
If you didn’t know (and I didn’t until my friend Megan alerted me), this week is Food Allergy Awareness Week. Hello! That’s a pretty important week to take note of, don’t you think?
In order to help raise awareness about food allergies, I thought I’d share some of my favorite allergy-friendly food blogs, all of which have amazing recipes whether you are an “allergy family” or not. Here are a few I enjoy and highly recommend:
Gluten Free on a Shoestring (the flourless chocolate cake is to-die for, plus Nicole has some really awesome gluten-free cookbooks and a bread book coming out in the fall)
Funny Tummy Cafe (gluten, egg, soy and dairy allergies)
Eggless Cooking (I’ve used several cookie/brownie recipes from here when baking for my egg-free friends)
Lexie’s Kitchen (gluten, dairy and egg-free)
Irresistibly Gluten Free (another gluten-free website with a cookbook that is a wonderful resource for gluten-free eaters)
I know there are many other recipe blogs/online resources for allergy awareness that I’m not aware of so please share any other useful blogs/sites in the comments. I also stumbled across this Top 25 list that looks like a great resource, too. Additionally many mainstream food blogs have categories dedicated to foods without certain ingredients (here on Mel’s Kitchen, I have categories dedicated to egg-free or gluten-free recipes and am hereby committing to do a better job at tagging recipes to help with food allergies!).
Even if you are like me and don’t have to worry about food allergies in your own home, there is good reason to educate ourselves on food allergies in general. It takes all of us to keep children and adults with food allergies safe. Ask questions to those you know who have food allergies. Know what foods are safe and if you know families that have food allergies, start keeping a list of meals that are food-allergy approved in their home. You never know when they might need a “safe” dinner brought to them!
As always, feel free to share any links/resources/advice in the comments about food allergies. I guarantee that most of you are more knowledgeable than I on this subject!

Today’s recipe, I’m happy to report, is egg-free, nut-free, gluten-free and very, very tasty. In fact, this has become our new go-to side dish for all of our recently grilled meals. I was in awe at how my boys devoured these. Not that I could blame them. The tender potatoes are lightly golden and crisp on the edges but velvety and creamy inside with the delicious hint of rosemary and garlic. Super yum. And really exciting to add another side dish that is simple, quick and really delicious to our dinner repertoire. Seriously, make these. They will get you out of any side dish dinner rut you are in. Guaranteed.
You can easily leave out the rosemary/garlic mixture. Just omit that step at the end and serve the potatoes after seasoning with salt and pepper. (But I'm warning you, you'll be missing out on some extreme deliciousness.)Ingredients2 pounds Yukon gold or red potatoes (peeled if using Yukon gold potatoes), cut into 1-inch pieces 2 tablespoons plus 1 teaspoon olive oil Salt and pepper 2 garlic cloves, finely minced 2 teaspoons minced fresh rosemaryDirectionsIn a large microwave-safe bowl, toss the potatoes with 1 tablespoon oil and 1/4 teaspoon salt. Microwave uncovered for 10 minutes, stirring every 1-2 minutes, until the potatoes soften but still hold their shape. It is really important to stir every couple of minutes or the potatoes might not cook evenly and you'll end up with some pieces that are super tender and others that are hard. Drain any excess liquid from the potatoes. Heat 1 tablespoon oil in a large 12-inch nonstick skillet over medium heat until very hot. Don't add the potatoes until the oil is sizzling. Add the potatoes (cut side down if using red potatoes with the skins on) in a single layer and cook them without stirring for 5-6 minutes until they are golden brown on the first side. Gently stir the potatoes, rearranging them again into a single layer and flipping so the unbrowned side is down. Cook until the potatoes are golden brown on the second side, another 5-6 minutes. Season with salt and pepper to taste. Combine 1 teaspoon oil, minced garlic and rosemary. Clear the center of the pan and add the mixture, cooking and mashing the garlic into the pan for about 30 seconds. Take care not to let the garlic burn. Stir the potatoes with the garlic/rosemary mixture. Serve. http://www.melskitchencafe.com/2013/05/golden-skillet-potatoes-and-lets-talk-food-allergies-for-a-second.htmlPrinted from Mel's Kitchen Cafe (www.melskitchencafe.com)Recipe Source: adapted from America’s Test Kitchen Quick Family CookbookPanna cotta légère au lait de riz et thé vert à l’ananas {recette végétalienne} et jeu-concours Nat Ali

Ce petit dessert est super léger et bien frais, parfait avec le soleil qui commence enfin à pointer le bout de son nez.
Vous pouvez décorer cette panna cotta avec des petits cubes d'ananas, comme sur la photo, mais ce n'est pas obligé car c'est déjà super bon tout seul !
J'ai utilisé de l'agar-agar pour gélifier du lait de riz infusé au thé vert à l'ananas (votre thé préféré fera l'affaire aussi !). L'agar-agar est un gélifiant naturel végétal extrait d'algues marines. On en trouve sous différentes formes (moi je préfère l'agar-agar sous forme de poudre), en magasin bio, et maintenant dans la plupart des supermarchés.

La marque Nat Ali -Nature & Aliments- propose à la vente (en magasin bio) des préparations en poudre, entremets, potages, produits sans sucre, agar-agar et autres aides culinaires... A l'occasion des 100 ans de la marque, on vous propose un petit jeu-concours pour gagner des lots de produits Nat Ali !
Les lots en jeu :
Pour le super gagnant : la box centenaire (assortiment de plusieurs produits de la marque dans une jolie boîte collector)
Pour le 2ème et 3ème gagnant : un lot de préparation pour muffins aux framboises
Alors comment on joue ? Tout simplement : dîtes-nous en commentaire à la fin de cet article quel est votre pire souvenir en cuisine, ou quel est votre souvenir le plus rigolo en cuisine ! (Veillez bien à laisser votre adresse mail dans le commentaire pour que l’on puisse vous recontacter si vous êtes tiré au sort)
Vous avez jusqu’au dimanche 28 avril inclus pour jouer ! Anna et moi procéderons à un tirage au sort via le site www.random.org pour déterminer les gagnants.

Ingrédients
500ml de lait de riz
2 cc de thé vert (à l’ananas et à la vanille)
30g de sucre en poudre
Quelques gouttes de vanille liquide
2g d’agar agar en poudre (marque Nat Ali par exemple, 1 sachet = 2g)
1 boîte de conserve d’ananas en morceaux au sirop ou de l'ananas frais
Préparation
Faire chauffer le lait de riz dans une casserole pendant quelques minutes à feu moyen. Retirer du feu juste avant l’ébullition, faire infuser le thé pendant 8 à 10 minutes dans le lait (dans un sachet, dans une boule à thé, ou directement dans le lait qu’on filtrera ensuite).
Laisser reposer quelques minutes.
Remettre sur le feu (feu doux à moyen), verser dans le lait le sucre en poudre et l’agar agar, bien mélanger jusqu’à ébullition. Laisser la préparation bouillir environ 30 secondes / 1 minute. Retirer ensuite du feu, verser dans des verrines.
Mettre les verrines au réfrigérateur pour au moins 2h.
A noter : la gélification se fera lors du refroidissement, pas d’inquiétude donc !
Dès gélification, déposer sur chaque verrine des morceaux d’ananas en morceaux et une cuillère à café de sirop d’ananas.
Tous à vos commentaires !!
Pour nous suivre sur notre page Facebook, c'est par ici !
Olivia
Partager l'article ! Panna cotta légère au lait de riz et thé vert à l’ananas {recette végétalienne} et jeu-concours Nat Ali: Ce p ...
Peanut Butter Oreo Muddy Buddies
type="html">

Peanut Butter Oreo Muddy Buddies
(click here for printable version)
9 cups Chex cereal (rice, corn or chocolate)
1 cup peanut butter M&Ms, chopped coarsely
1/4 cup butter
1 cup semisweet chocolate chips
1/2 cup creamy peanut butter
1 tsp vanilla
10 peanut butter Oreos
1 cup powdered sugar
1. Mix cereal and peanut butter M&Ms in large bowl and set aside. In medium microwave safe bowl combine butter, chocolate chips, and peanut butter. Microwave in 30 second increments until everything is melted and smooth. Stir in vanilla. Set aside.
2. Crush Oreos in your food processor (I like to have them crushed fine which is why I use my food processor but you can also crush them in a ziploc bag to the consistency you prefer). In a large ziploc bag add Oreo crumbs and powdered sugar. Mix well.
3. Pour chocolate over cereal and M&Ms. Stir until completely covered. Pour into ziploc bag and shake until cereal is coated with powdered sugar mixture. Pour onto large rimmed cookie sheet and let set 5 minutes to let chocolate set completely. Eat and enjoy!

Did you get an email to see if you were the winner? Check it out and see!
The other day on Facebook I ask what kind of Oreo I should use in the new recipe I was making.
The top votes were for mint and peanut butter. Mmmm so delicious!! I love both of them but as I was browsing through the store I decided on the peanut butter Oreos especially after I "found" the peanut butter M&Ms.
Maybe I should say they "found" me. Seriously, I "heart" those little things so much.
Well this was a hit. Everyone at this house was in love. The combination of peanut butter and chocolate is the ultimate for me so adding even more chocolate and even more peanut butter seemed like the most natural thing in the world.
Heaven. Heaven. Heaven.

(click here for printable version)
9 cups Chex cereal (rice, corn or chocolate)
1 cup peanut butter M&Ms, chopped coarsely
1/4 cup butter
1 cup semisweet chocolate chips
1/2 cup creamy peanut butter
1 tsp vanilla
10 peanut butter Oreos
1 cup powdered sugar
1. Mix cereal and peanut butter M&Ms in large bowl and set aside. In medium microwave safe bowl combine butter, chocolate chips, and peanut butter. Microwave in 30 second increments until everything is melted and smooth. Stir in vanilla. Set aside.
2. Crush Oreos in your food processor (I like to have them crushed fine which is why I use my food processor but you can also crush them in a ziploc bag to the consistency you prefer). In a large ziploc bag add Oreo crumbs and powdered sugar. Mix well.
3. Pour chocolate over cereal and M&Ms. Stir until completely covered. Pour into ziploc bag and shake until cereal is coated with powdered sugar mixture. Pour onto large rimmed cookie sheet and let set 5 minutes to let chocolate set completely. Eat and enjoy!
Easy Healthy Recipes - Start Slow and Finish Big With Easy Healthy Recipes
It is of vital importance that what we eat comes from a healthy recipe. This is because healthy recipes, as the term imply, contains all the essential nutrients and minerals our body require. Healthy recipes stay away from all kinds of processed foods that are rich in sugar and salt. Instead, these types of recipes bank on fresh vegetables and fruits. To give you a really interesting and quick to fix healthy recipe, read on.
For breakfast, you can have a delicious Grape Nuts Bars. To accomplish this recipe, you need to have 3 cups of grapes nut cereal, a cup of semi-skimmed or skimmed milk and a cup of unsweetened applesauce as well as a cup of dried raisin-sized fruit and 2 tablespoons of vanilla extract.
Then, mix all the ingredients in a bowl and pour into a non stick cookware. Then for 35 minutes at 350 0 Fahrenheit, bake the mixture in an oven. When it gets to the desirable firmness, let it cool and cut into squares.
The recipe above is just one example of a healthy, mouth-watering recipe that you can enjoy. Whatever recipe you are going to make, remember the following ideas.
To get on the road of successful healthy eating, you need to follow a diet that consists of small and easy process. Stay away from huge steps that give you no assurance of getting finished. Simplifying your recipes on color, variety and freshness rather than on the complex calorie counting and measuring portion sizes will ensure that you get your ideal weight.
You need commitment and perseverance as you reach your goal. Remember that when you are aiming for something, the result is not always at hand. Start slow and finish big. Diet change does not come in just a snap of your fingers. Switching from butter to olive oil for a start is better than having no action at all.
Fixing a healthy and easy recipe is not about obsessive-compulsive nutrition fad diet. It's not even about depriving yourself of your favorite foods. Rather it is about making healthy choices in a way that works for you and living life feeling great and energized.
Bacon and Jalapeno Snacks

\ABS\Auto Blog Samurai\data\Healthy Recipe Collections\all\Jalapeno-Snacks.jpg)
Three Fabulous Menus for Feeding Large Groups

Have you ever been put in charge of planning a menu for a large crowd? You know, like for a family reunion, community or church dinner, birthday celebration, baby or child blessing/baptism, etc? If so, you know that creating and carrying out a menu for a large group can be intimidating and kind of stressful and maybe even slightly annoying. But worry no more, because I’ve totally got your back. Today, I’m presenting you with three sample menus that will feed (and dare I say, amaze and please) 20 or more people. I’ve based the amount of food on 20 average-size eaters or a general mix of kids and adults. If you are feeding all adults or all children, you can increase or decrease as necessary.
Each menu includes the recipes and details what can be made in advance. It’s all there for you. To simplify your life.
My theory is to create a menu with a few recipes that will knock the socks of your guests. And then completely simplify the rest. For each menu plan, I’ve chosen recipes specifically because not only are they delicious, but they can, for the most part, be made in advance one way or another.
Make sure to read through the menu plan before taking my word for any of the quantities – your judgment will ultimately be best, but at the very least, the menu plans should give you a great start. I will warn you that my theory is: it is always better to have too much food than not enough. Can I get an amen to that? Clicking on the menu description will pull up a printable .pdf. Have fun!
Healthy Recipes For Kids
Healthy eating is important for proper growth in kids. Parents want to give their children a variety of nutrient-enriched food and drinks to help them to grow stronger and healthier. Usually, life patterns are set in childhood and early puberty. Following a healthy diet routine and using healthy recipes will give them the benefit of enjoying a strong body for the rest of their adult lives.
Healthy recipes for kids can be prepared by knowing facts about the food we eat. There is high-protein, high-fiber food that works for kids, and nutrient-empty, processed junk food that works against them. Studies show that on average, kids receive around thirty-eight percent of their daily calories from fats. The bad fat is responsible for creating free radicals in the body, which harm our good cells--including the brain cells. This fat negatively contributes towards obesity, heart disease, allergies, and other harmful conditions.
Sensible diets make sure that your kids are well, prevent the risk of developing dangerous diseases, and keep the foundation for solid mental as well as physical health. Junk food and unhealthy food can leave your child open to food hazards and infection, especially during rapid growth periods.
Statistics show that the obesity rate in kids is four times higher than it was in 1960s.This leaves children more susceptible to problems like diabetes, growth disorders, and sometimes even cancer.
Good food doesn't mean bland taste. Kids can easily be lured to eat healthy food by presenting it in a colorful and decorative manner. The carrot will look enticing if it is shaped like a cartoon figure, spinach can taste yummy if combined with a dash of cheese, and cereals will be wiped clean from the dish if presented in attractive serving plates. The trick is to educate them about the food, list the benefits, and make kids feel that they are eating something special and different each day.
Wednesday, May 15, 2013
Cinco de Mayo Round-Up
/ABS/Auto%20Blog%20Samurai/data/Healthy%20Recipe%20Collections/Dainty%20Chef/7640753582_2860359e25.jpg "7640753582_2860359e25")
/ABS/Auto%20Blog%20Samurai/data/Healthy%20Recipe%20Collections/Dainty%20Chef/8120341701_50c9ef1d99.jpg "8120341701_50c9ef1d99")
My friend, Katie and her husband Loren are the hosts and they have done this type of dinner before. Katie was responsible for looking at each dish each couple was bringing and pairing it with a wine. Each couple is responsible for two dishes and the two bottles of wine. I will be making a spring cheese dip that I hope to share and some amazing cupcakes, well at least my hopes are up that they are amazing. Hopefully the weather will be glorious and we can enjoy one another and beautiful weather.
If you are celebrating at all this weekend, I thought I would put together a list of my Mexican favorites. So without further ado here is what made the list:
Appetizers/Salads:
Margaritas:
Dessert:
How to make cream sauce without cream
Anything draped in a velvety-smooth cream sauce is bound to be delicious. It’s also bound to be high in calories and full of saturated fat—which most of us could do without. So before you kiss your mother’s recipe for macaroni and cheese goodbye or take your last spoonful of a creamy, comforting soup, consider that you could make the same creamy recipes with WAY less fat and fewer calories by using no cream at all. Yes, really.
Chef John Ash developed a no-cream cream sauce for EatingWell Magazine made from simple pantry staples as a way to slash fat and calories from dishes that are usually laden with fat. One cup of his Cream Sauce without the Cream has only 159 calories and 0 grams saturated fat. Compare that to 1 cup of heavy cream, which has 820 calories and 55 grams saturated fat.
Here are our tips to make a cream sauce without cream and Ash’s secret no-cream cream sauce recipe.
1. Use Onions and White Wine to Add Flavor
Fat has a knack for amplifying flavor. So if you’re going to take fat out of a dish, you need to compensate by adding a little more flavor to what you’re making. That’s why this no-cream cream sauce is better for using in creamy dishes than just replacing heavy cream with reduced-fat milk. To add savory flavor to your cream sauce, sauté onions in a little bit of olive oil. Then add a generous dose of white wine to brighten it up. The result is a mild, satisfying flavor that you wouldn’t get by just using reduced-fat or nonfat dairy to replace heavy cream.
2. Use Rice to Thicken the Sauce Without Adding Fat
The fat in heavy cream also gives creamy dishes viscosity—a thick texture. To replicate that texture in this healthy recipe for cream sauce, we use starchy white rice as a thickener. By cooking and blending rice into the sauce you get a creamy texture without adding much in the way of flavor. And of course, rice is virtually fat-free. So you get the rich mouthfeel of heavy cream without added fat and calories.
3. Blend the Sauce to Make It Smooth
Another key to making a healthy cream sauce with a smooth consistency is to blend it. It’s best to use a blender instead of a food processor since blenders do a better job of pureeing liquids into a smooth consistency. If you have a large blender, you may be able to blend all your sauce in one batch. If the liquid comes more than two-thirds of the way up the bowl of your blender, you should blend your sauce in two batches—you’ll get a smoother consistency that way. And don’t forget: use caution when blending hot liquids! Don’t overfill your blender and do take the plastic stopper off the lid and cover it with a towel so the steam can escape.
Don't Miss: .
Ready to whip up a batch of no-cream cream sauce to make all your favorite creamy recipes healthier? Here’s a tip: make a big batch and save some in your refrigerator for a week or freeze it. If you put in the effort one time to make a big batch of this cream sauce base, you can use just a portion of it now and have the rest at the ready for a later time so you’re not tempted to just take the easy route and open a carton of heavy cream for your next creamy recipe.
Recipes That Use This No-Cream Cream Sauce: Old-Fashioned Winter Vegetable Chowder, Mac & Cheese and More Creamy Recipes Without Cream
Cream Sauce without the Cream
Print, share and save this recipe!
Here’s a formula for making “cream sauce without the cream” to use as a healthy replacement for fat- and calorie-rich cream sauces in your favorite soups, pastas or sauces. This healthy recipe for cream sauce without heavy cream makes a big batch, more than you’ll most likely need for one recipe, so refrigerate or freeze the extra sauce to use in other recipes.
Gateaux portion à la ricotta et au citron
Il me restait une moitié de pot de ricotta et je voulais l'utiliser en version sucrée. Alors pourquoi ne pas revisiter le gateau au yaourt? Ben oui, la ricotta est certes un fromage (donc un lait fermenté) et il est crémeux. De plus le citron lui va à ravir! Alors c'est parti...Pour réaliser cette recette, il faudra vous munir d'une demi cup (ces mesures de la cuisine anglo-saxonne) ou tout bêtement un contenant de 125mL (un verre, un pot de yaourt,...). Car, oui, la recette reprend le principe du gateau au yaourt.
Pour 9 gateaux:
1 mesure de ricotta3 mesures de farine T801 cuillère à soupe de levure chimique2 mesures de cassonade1/2 mesure d'huile végétale (une huile d'olive pas trop forte par exemple)2 oeufsle zeste et le jus d'un citrondu sucre glace et le jus d'un autre citron pour le glaçagedes graines de pavot Préchauffer le four à 180°C.Dans un saladier, verser la farine, la levure chimique et la cassonade. Ajouter la ricotta et les oeufs, mélanger. Ajouter l'huile et bien mélanger pour obtenir une pâte lisse et homogène. Finir en ajoutant le zeste du citron râpé ainsi que son jus, mélanger.A l'aide d'une petite louche, remplir des moules à muffins en silicone (s'ils ne le sont pas, les beurrer ou les huiler légèrement) en prélevant une louche pas tout à fait remplie de pâte. Enfourner pour 25min.
Laisser refroidir 10min avant de démouler sur une grille. Laisser refroidir complètement.
Pour le glaçage (méthode empirique), verser 4 grosses cuillères à soupe de sucre glace dans un récipient. Délayer avec quelques cuillères à soupe de jus de citron (commencer par 2) jusqu'à obtenir une pâte (lorsqu'on la remue il doit y avoir de la résistance et couler difficilement de la cuillère).Déposer deux cuillères à café de ce glaçage sur chaque "portion" de gateau, l'étaler avec le dos de la cuillère à café et faire pleuvoir dessus des graines de pavot qui viendront s'y prendre au piège.Laisser sécher le glaçage. Croquer!Ils sont jolis, la texture (due à la ricotta) est dense et très intéressante. Une douceur acidulée pleine de peps...Easy DIY healthy chicken taco bowls
How many meals can you make with a corn tortilla? The outside-the-box cooks in the EatingWell Test Kitchen gave themselves the challenge of creating a few new dinners based on corn tortillas for the May/June 2013 issue of EatingWell Magazine. But they really outdid themselves with this new Chicken Taco Bowls recipe and guess where they found their inspiration? At the bottom of a muffin tin.
By flipping the muffin tin over and nestling a tortilla into the creases between four cups, they were able to turn softened tortillas into little bowls. They filled the bowls with an easy-to-whip-up filling of chicken and your favorite healthy taco toppings.
Don't Miss: How to Make Killer Guacamole
To make the bowls, you’ll first need to warm the tortillas to prevent them from cracking and breaking. Here are three ways to warm your tortillas:
In the oven: Wrap stacks of 8 tortillas in foil; place in a 375°F oven for 10 to 15 minutes.
On the stove: Turn a gas or electric burner on high. Using tongs, slide one tortilla at a time over the burner for a few seconds, alternating sides, until it’s softened and beginning to char. Cover tortillas to keep warm.
In the microwave: Wrap a stack of 8 tortillas in a barely damp, clean kitchen towel (or paper towel); microwave on High for 30 to 45 seconds.
Chicken Taco Bowls
Print, share and save this recipe!
This chicken taco bowl recipe uses the underside of a muffin tin as a mold to bake cute little homemade “tortilla bowls.” The “tortilla bowls” are filled with a zesty chicken filling and topped like nachos. If you have 2 large muffin tins, you can make all 8 “bowls” at once. Bake them in the upper and lower thirds of the oven, rotating top to bottom about halfway through baking.
What’s your favorite filling for a corn tortilla or taco? Tell us what you think below.
Mother’s Day Giveaway: Gourmet Whoopie Pies
Wouldn’t your mom love a delicious box of Gourmet Whoopie Pies delivered to her door? Well keep reading my friends because there’s something in it for you too!
These gourmet whoopie pies came to my door at the perfect moment because my mom was sitting at my dining room table! I excitedly opened the box and we dug in. She grabbed Red Velvet Raspberry and I went for Raspberry Shortcake (like mother like daughter!). I’m excited to share this giveaway for you because not only do you get 6 delicious gourmet whoopie pies delivered to your door but you ALSO get 6 delicious gourmet whoopie pies delivered to your mom’s door. Isn’t that awesome?! If you cannot have the prize delivered to your mom you can choose another significant woman in your life to surprise.
/ABS/Auto%20Blog%20Samurai/data/Healthy%20Recipe%20Collections/In%20Katrina%20Kitchen/Gourmet-Whoopie-Pie-Mothers-Day-Giveaway-In-Katrinas-Kitchen-text-640.jpg)
*Both shipping addresses need to be within the continental US.
By entering you are agreeing to the Official Rules.
One (1) winner will receive a box of 6 Gourmet Whoopie Pies delivered from Cape Whoopie, Maine’s Gourmet Whoopie Pies and will also have a box of 6 Gourmet Whoopie Pies delivered to your mom (or another significant woman in your life).
Oreo Cookies and Cream Cookies


Several weeks ago I went to lunch with a few friends from my high school days. I love getting together with them. I think we always end up laughing more than we actually talk or eat. Which is heavenly, if you ask me. I need a good laugh every now and then, you know. It makes the hum drum, mediocrity of every day life brighten right up and seem easier to take. I saw this awesome quote on Pinterest a while back. It’s from Audrey Hepburn (you know who she is, don’t you?…pretty lady that made a lot of movies back in the day). Here’s what she had to say…
“I love people who make me laugh. I honestly think it’s the thing I like most, to laugh. It cures a multitude of ills. It’s probably the most important thing in a person.”
~Audrey Hepburn
Love that, love it a lot.
Anyhow, while I was at lunch laughing with my ladies, my dear friend Carrie told me that she makes Grandmas Chocolate Chip Cookies all the time.
So do I! Is what I told her. I make them more than any other cookie recipe on this site. They are my go-to-need-a-treat recipe.
Then she told me how she makes that same recipe, but leaves out the milk chocolate chips and adds crushed Oreos and white chocolate chips instead. Brilliant!
You know I had to rush home and try it.
Which is what I did.
Which is why I am sharing them today with you. Because that’s what friends do, you know. They share great ideas, nice thoughts a laugh or two…and cookies.
They share cookies. 
\ABS\Auto Blog Samurai\data\Healthy Recipe Collections\JamieCook\IMG_3730_edited-1.jpg)
These Oreo Cookies and Cream Cookies are soft, moist and chuck full of the traditional “Cookies and Cream” flavor so many of us love. Thanks for the great idea, Carrie!
Time: 45 minutes
Yield: 48 cookies
Recipe adapted from this cookie recipe, idea inspired by the lovely Carrie Ann Newman
3/4 C butter, softened
3/4 C brown sugar
3/4 C sugar
2 eggs
1 t vanilla
1/2 t salt
1 t baking soda
1/2 t baking powder
2 1/2 C flour
12 oreo cookies
1 (12 ounce) bag white chocolate chips
\ABS\Auto Blog Samurai\data\Healthy Recipe Collections\JamieCook\IMG_3643_edited-1.jpg)
1. Preheat your oven to 350 degrees. (If you have a convection oven, I would suggest 325).
2. Toss 3/4 cups of softened butter into your stand mixer or large mixing bowl. Beat it until it has broken down and is smooth. Add 3/4 cup brown sugar and 3/4 cup sugar. Cream it all together until light and fluffy. Should take 2-3 minutes. Add 2 eggs and mix again for 1 minute. Add 1 teaspoon vanilla and mix just until combined.
\ABS\Auto Blog Samurai\data\Healthy Recipe Collections\JamieCook\IMG_3645_edited-1.jpg)
2. In a separate bowl combine 1/2 teaspoon salt, 1 teaspoon baking soda, 1/2 teaspoon baking powder and 2 1/2 cups flour. Toss it all together with a fork and add it to the creamed mixture. Mix until combined.
\ABS\Auto Blog Samurai\data\Healthy Recipe Collections\JamieCook\IMG_3646_edited-1.jpg)
3. Grab yourself some Oreo Cookies.
\ABS\Auto Blog Samurai\data\Healthy Recipe Collections\JamieCook\IMG_3648_edited-1.jpg)
Toss 12 of them in a freezer safe ziploc bag. You can use a regular ziploc bag as well, you just need to be careful not to break the bag open. Take a rolling pin and smash the Oreos just a bit. You don’t need them to be crushed into fine crumbs, just broken up some.
\ABS\Auto Blog Samurai\data\Healthy Recipe Collections\JamieCook\IMG_3649_edited-1.jpg)
Toss them into the mixer.
\ABS\Auto Blog Samurai\data\Healthy Recipe Collections\JamieCook\IMG_3651_edited-1.jpg)
4. Add 1 bag of white chocolate chips to the mix…
\ABS\Auto Blog Samurai\data\Healthy Recipe Collections\JamieCook\IMG_3652_edited-1.jpg)
and mix everything together just until combined.
\ABS\Auto Blog Samurai\data\Healthy Recipe Collections\JamieCook\IMG_3653_edited-1.jpg)
5. Roll the dough into 1 1/2 inch balls and place them on a cookie sheet that has been sprayed with cooking spray.
\ABS\Auto Blog Samurai\data\Healthy Recipe Collections\JamieCook\IMG_3656_edited-1.jpg)
6. Bake for 7-9 minutes, or until the cookies crack along the tops. The trick here is to be sure the cookies don’t over bake. You want to take them out of the oven before they are all the way cooked through. Then let them rest on the hot cookie sheet for a couple of minutes to finish baking all the way.
Grab a glass of cold milk and enjoy!
\ABS\Auto Blog Samurai\data\Healthy Recipe Collections\JamieCook\IMG_3723_edited-1.jpg)

Chocolate Oreo Lasagna
/ABS/Auto%20Blog%20Samurai/data/Healthy%20Recipe%20Collections/Dainty%20Chef/8663299541_7e667f4a84.jpg "8663299541_7e667f4a84")
A few weeks ago the ladies I work with got together for a night of Bunco. It is a really fun game and since we only do it once a year, I look forward to the night pretty much all year long. We each contribute some type of dish and we catch up on everything but school things. We also have retirees come back to join us and others who have left our school for some reason or another.
I knew that I wanted to contribute some type of dessert for Bunco night, and this recipe has been bookmarked for way too long. It reminded me of the Chocolate Chip Cookie Delight that my coworkers love so much. It is pretty much the exact same thing, but instead of a chocolate chip cookie layer you have an Oreo one. Both are winners in my book and both happen to be big crowd pleasers. Another added bonus is that this requires no baking time and is a cinch to throw together. This would be perfect for those hot summer days that are right around the corner.
Chocolate Oreo Lasagna
Ingredients:
1 package Oreos
1/2 cup (1 stick) butter
1-8 oz package cream cheese, softened
1 cup powdered sugar
2-12 oz tubs whipped topping
2-3.9 oz packages chocolate instant pudding
3 ¼ cups cold milkWhat you’ll do:
Process cookies in a food processor until they are finely crushed. Put aside 1/2 cup of Oreo crumbs for sprinkling on top at the end. Combine remaining Oreo crumbs with the melted butter and stir until the crumbs are well coated. Press evenly into the bottom of a 13×9 inch dish. Refrigerate until ready to use.In a large bowl, beat the pudding mixes and the milk together with a wire whisk or your electric mixer for two minutes.
Using an electric mixer, whisk together the cream cheese and powdered sugar until smooth. Add in 1 container of the whipped topping and fold together until well incorporated.
With a spatula, spread the cream cheese layer evenly across the top of the Oreo crust, then spread the pudding on top. Top the pudding layer with the remaining whipped topping, then garnish with crushed Oreos. Refrigerate until ready to serve.
Source: Stick a Fork In It
Tuesday, May 14, 2013
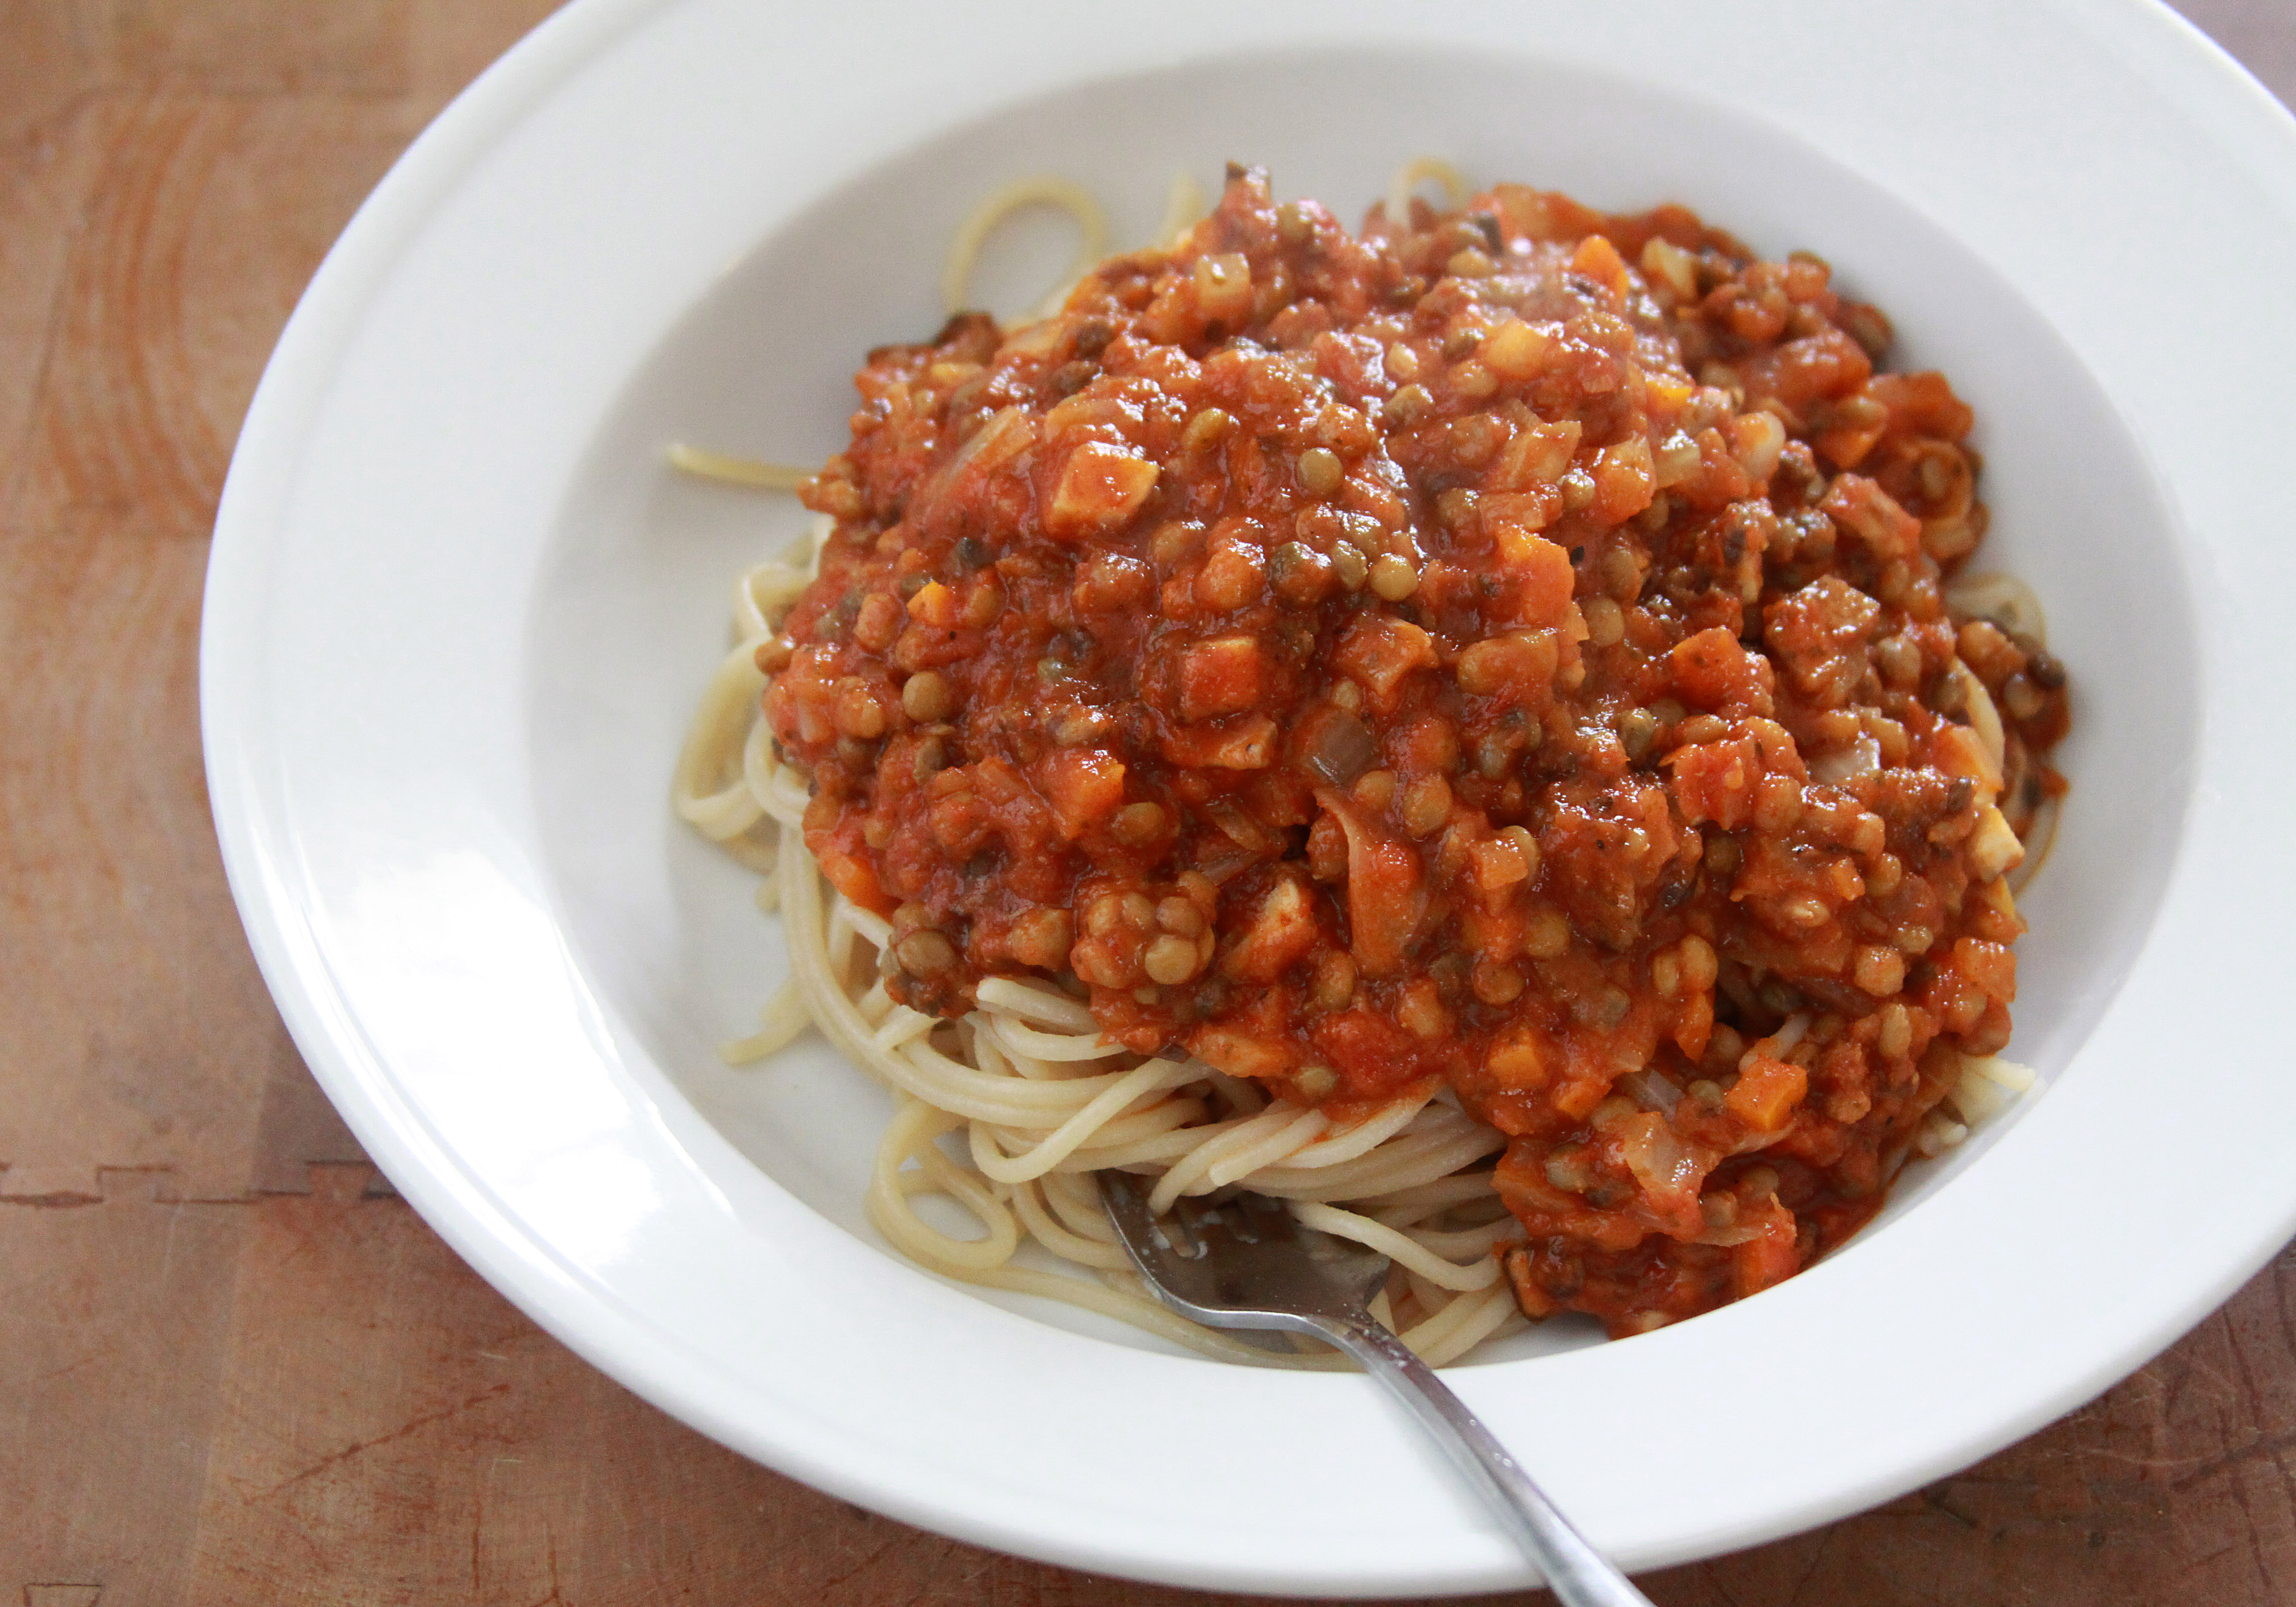
Spaghetti with Lentil Vegetable Marinara (gluten-free and vegan)
Lately I’ve felt incredibly distant from Espresso and Cream. I can honestly say that in the 3 1/2 years that I have been blogging, I have never felt my passion and excitement for blogging trail off in the least bit. Until recently. That’s not to say that I’m going to stop blogging, it’s just something I’ve been thinking and feeling for the last couple weeks. More than anything, it seems that my life is so full of food that at the end of the day I feel creatively tapped out. My job, which I love, has me in the kitchen constantly, creating new recipes and developing new ideas. And to top things off, Joe and I embarked on a cleanse that has made every day eating and cooking more of a creative challenge than I had anticipated.
I’ve loved our cleanse and enjoyed being forced out of my comfort zone in the kitchen. Reading labels is a new (not so favorite) pastime and I have a new found appreciation for anyone who has to live with a food allergy, especially a gluten or dairy allergy since it is in everything.
That said, I’ve also had a lot of my creative juices zapped since planning for and preparing three cleanse-friendly meals a day takes a lot of time, effort and energy. Already I can see how things are starting to get easier and I’m sure that if Joe and I were to stick to this diet longer term it would become second nature to me, but for now it is uncharted territory.
All of that is really just me saying thank you for understanding if I’ve seemed a bit distant and removed from E&C over the past couple weeks. We are now on our last week of the cleanse and feeling great, but I’m also looking forward to adding some foods back into the regular rotation, mainly eggs since they are so useful in the kitchen.
In the meantime, I thought I would share with you this dish I made for lunch on Sunday. It’s incredibly simple to pull together and also super tasty. I should also note that it is husband-approved, meaning it feels hearty and satisfying, without weighing you down after. The “meat sauce” is made with a mixture of lentils, mushrooms, onions and sweet peppers. The combination is flavorful and packed with protein and vitamins. And if, like me, you are seeking ultimate convenience, there is no shame in purchasing pre-cooked lentils to cut down on time in the kitchen.

Spaghetti with Lentil-Vegetable Marinara
Makes 4 servings
Ingredients
*4 servings of gluten-free brown rice spaghetti
*1 tablespoon olive oil
*1 medium onion, chopped
*1 clove garlic, minced
*1 medium orange or red sweet pepper, chopped
*1 cup chopped mushrooms
*1 1/2 to 2 cups cooked brown or green lentils (to make things quicker/easier this week, we bought lentils pre-cooked at Trader Joe’s)
*1/2 to 3/4 teaspoon salt
*1/4 teaspoon ground black pepper
*1 jar (25 to 28 oz) gluten-free marinara sauce of choice (I used a roasted garlic variety)
Directions
*Cook pasta in salted water according to package directions. While pasta cooks, you can throw together the rest of this dish.
*Heat oil in a large skillet over medium high heat. Add in the onion and cook for 3 to 4 minutes or until onion is softened and opaque. Add in the garlic, sweet pepper and mushrooms and continue to cook for 3 to 4 minutes more or until pepper and mushrooms are cooked through and tender. Add in the lentils, salt and black pepper. Stir until well combined.
*Pour sauce into skillet and reduce heat to low. Cook for 2 to 3 minutes more or until sauce is warmed through and flavors are mixed together.
*Serve mixture atop cooked pasta.
Happy Cooking!
Madison
Source: Source
Cheesy Tater-Topped Chicken Casserole
/ABS/Auto%20Blog%20Samurai/data/Healthy%20Recipe%20Collections/all/Cheesy-Tater-Topped-Chicken-Casserole.jpg)
Outrageous Eskimo Bars

If words could adequately describe the deliciousness you see before you, it would be summed up in the words I’ve translated from my eloquent husband while ice cream and caramel dribbled down his chin: “Uh, seriously, Mel, these are unreal.” And then he proceeded to steal my firstborn’s caramel sauce and eat five more. After the excitement had died down (and Brian gave Jackson his caramel back), he confessed that Eskimo bars would easily make it into his top five desserts of all time, which might possibly be the most epic statement to ever leave his dessert-loving lips. My kids? Well, they were wildly joyful at being able to dip the crackly-coated, ice cream-topped brownie into their very own special pot of warm caramel sauce. Their little lives were complete.
Have you heard of Eskimo Bars? Apparently a while ago on the Food Network show “Best Thing I Ever Ate” (do they even air that anymore??), Giada De Laurentiis expounded prolifically on her love for these crazy delicious bars she had in Jackson Hole, Wyoming. I never saw the show, but my friend, Lisa, sent me her version of the recipe years ago (years, people!) and I just recently tried them. All I can say is, I am kicking myself for not trying them sooner. They really are unreal, just like Brian said.

Basically, you take a decadent baked brownie layer. Top it with a thick, creamy layer of good quality vanilla ice cream. Cut into rectangles and dip in a homemade magic shell mixture that hardens immediately and leaves a crisp, thin chocolate coating on the bars. Now here’s the kicker: you take the culmination of brownie, ice cream, chocolate bliss between your little fingers and dip it into luscious warm caramel sauce. It is messy. Very messy. But the absolute explosion of rich, decadent brownie sundae happening in your mouth will alleviate any worries about cleanup. Can you even stand it?

Now, listen. I know some of you (like me) hate the thought of dipping desserts. I get it. But I promise that the anxiety you are feeling is unwarranted! The chocolate shell mixture is so easy to work with that the dipping part is perhaps the easiest part of the recipe (but not the cleanest, not the cleanest at all). Don’t be like me and let years go by before you make these. Think of the rock star status you will earn when you serve these to your family and/or friends. And it will be well deserved. Keep in mind that you can make these start-to-finish several days or even weeks in advance and the process can be spread over several days.
While you contemplate those awesome facts, I will leave you alone as I go delve into the depths of my terribly narrow freezer and dig out the last three of these I hid away from humanity. Dark corner away from children, here I come. Oh my gosh. They are so good.

Recipe Source: inspired by the famous Eskimo Bars at Snake River Grill in Jackson Hole exclaimed by Giada De Laurentiis as the “Best Thing She’s Ever Ate” sent to me by my friend Lisa H. (thanks, Lisa!)
Let It Go, by Chris Williams (Giveaway)

I saw this picture yesterday on Facebook and thought it beautifully simple and profound. What Mr. Rogers has to say is plain truth. Amid tragedy, and terrible circumstances there are always good, kind people there to pick up the pieces…lending a helping hand and providing a stable shoulder to cry on. It is amazing to watch, isn’t it? There are definitely still so many “helpers”.
In light of the Boston Marathon Bombing, I felt it best to save the recipe I had prepared for today’s post and share a little something else instead.

This is a book I read last week.
“Let It Go” is about a man (Chris Williams) who lives here in my city. Seven years ago his pregnant wife and two children were killed in a car accident by a drunk teenage driver. From the very night of the accident he chose to forgive the boy who was responsible for taking the life of his family members. I have been fascinated by this story from the time I heard reports of it here in the local news. How could any human being have the strength to forgive so quickly, and freely! It was a surprise to me, as I would imagine it to be to most people.
In the book Chris gives detailed explanation. He testifies of Christ and the blessings of forgiveness. While his road has not been easy, his choice to forgive has made the challenges of loss much easier to bear. Instead of embracing anger, hate or revenge he let go of those natural feelings and has taken hold of love, kindness…forgiveness.
I mention (and recommend) this book to you all today simply because, the world can be such a terrible place. There are plenty of reasons to be angry. Seeing innocent people become victim to senseless terrorism is so frustrating! Most of us shake our heads with the words “why” rolling over and over in our minds. I haven’t ever been able to come up with a sufficient answer to that question. Have you? I don’t know why these things happen. What I do know is, I want to be one of the “helpers”. I want to choose love and kindness. I hope to follow Chris Williams example of charity.
You can watch a video on the Mormon Channel called “My Burden Was Made Light” about Chris and his family. Click here, or on the picture above to see it.
I would love to give a copy of “Let It Go” to two of you dear readers. To enter just leave me a comment below telling me something good! It can be an act of kindness you have witnessed. It can be something sweet your child did or said. It can be something good you would like to do for someone else. What ever you choose.
My family and I are praying for those of you effected by the terrible Boston Marathon Bombing. May you feel the love of God supporting you during this difficult time.
Terrine of roquefort and PEAR on a sand of nuts

An entry very original and very fresh, a terrine of roquefort and PEAR on a sand to the nuts!
INGREDIENTS for 4/5 terrines of 8cm in diameter (take part)
TERRINE:
* 100 g of roquefort
* 100 gr of fresh cream
* 4 small williams pears
* 1 sheet and a half of gelatin
* 4 slices of smoked ham
Sand to the nuts
* 90 gr of flour
* 50 gr of butter
* 1 egg yolk
* 70 g walnut or hazelnut powder
* a pinch salt pepper and Espelette pepper
PREPARATION:
Prepare nuts Sands: incorporate all the ingredients until a dough, on paper cooking place them take part and add the dough into small thin layer, press with a spoon (the sand should not be too thick) Bake at 180 ° C for 12-15 minutes.
Terrine of roquefort: combine roquefort and cream until well homogenous, do soften gelatin in cold water, the recover and make it lukewarm with a c to soup and half water, a time well melted add to well prepare mix.
Cut the ham into thin slices and sliced pears, arrange the slices crosswise by placing the sand in the Middle cast off the ham on the sand and get WINS piece, add a thin layer of roquefort/cream and top slats of pears (2 coats) then cover with another layer of roquefort, decorate the top with a rosette of PEAR and chive.

To succeed this entry do not do a too thick sand, add thin layers of cream roquefort to prevent AC from being too mushy and add between layers of roquefort, a good dose of slices of PEAR to have one side very fresh.
Share article! Terrine of roquefort and PEAR on a sand of nuts: A very original and very cool entry, a bowl...
Subscribe to:
Posts (Atom)